Template tutorial for Ruby
((If Ruby Ever doubted my love for her, this novel should seal the deal. ;) ))
(click on images for bigger!)
Okay! Here's the first thing you'll need:
Let us begin our tutorial for how to use templates in the wonderful Paint Shop Pro!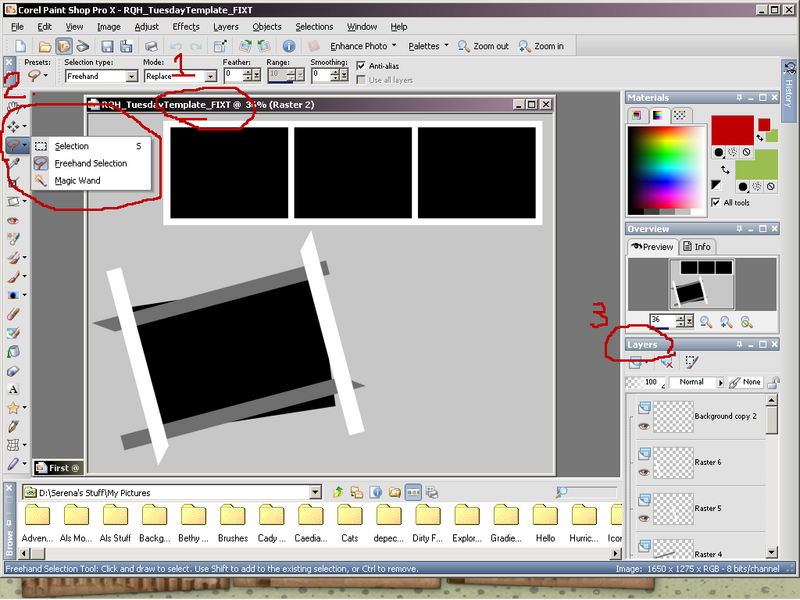
1. The template (that's very important! ;) )
2. These two tools will be vitally important for ease in your quick pages.
3. Layers. For those of you who aren't already in love with these. Learn them, love them, live them. They are the most important thing you'll ever use. And pet them often, they get lonely.
Before we get started, allow me to say this. I'm writing this tutorial as if you guys know your way around, feel free to ask ANY questions you want, or if you have any thing you need clarification on, speak up! There are NO stupid questions at all, EVER! We all begin somewhere!!
Also, I'm doing this tutorial in PSP10, this will equate to earlier versions of PSP as well. :)
Okay, so there's two types of templates I've seen thus far, keep in mind I've only been digiscrapping since November of last year so I could be wrong. Anyway, the two types I've seen are the layered (OMG, I love these, they make life SO much easier..) and the flat png's or jpgs.
(As an aside for anyone who doesn't know, the difference between JPG's and PNG's is phenominal. JPG's are "smaller" good for posting to galleries and for small pictures. They work by eliminating known limitations of the human eye so you won't really notice the loss which makes the format excellent for compression. PNG's are bigger because they hold more color (millions as opposed to the 24-bit of JPG). You can always compress png's later, you can't decompress the JPG's, once you lose the color, you lose them!)
The layered, which is what the first picture is, is what we're working on first. By now you should have selected the pictures you want, and the kit you're going to use.
The first thing I like to do is the background. (I have to do mine 1650 pixels by 1275 pixels so that I can print them out 8 x 11 so I adjusted my template and resized the elements accordingly) This background is by Maryse Vincent from her Cherry Fields kit called Background 4. :)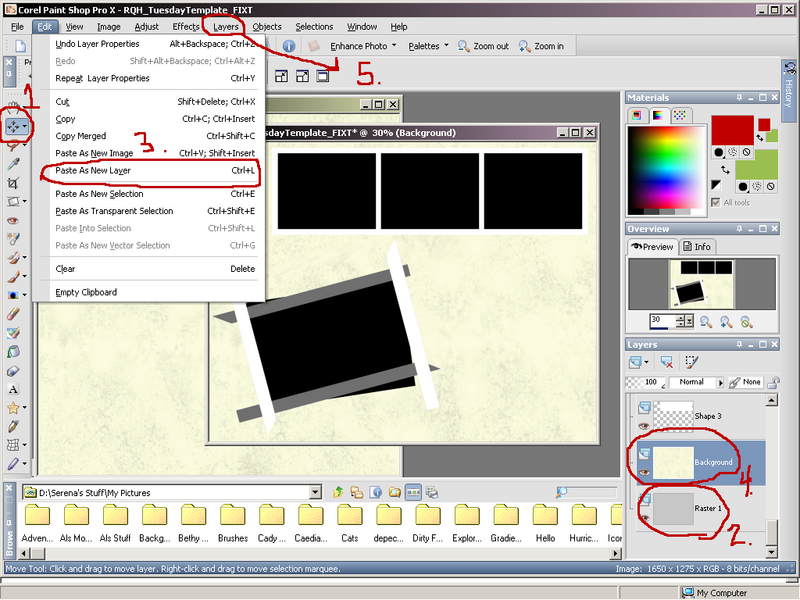
Here in this picture I've done a few things..
1. The four arrows (called the "Move" tool) was selected to make my life easier. :) I then went to the template and clicked on the portion I wanted. This way you can click on the frame, or one of the photo mats to select which layer you want to work on. Because I started with the background, I clicked on the template which brought me to "Raster 1" of the layers. You can see that in the layers section.
2. Here we are at Raster 1! That will be selected right now and highlighted (in the picture the other layer is highlighted because I've already went past this stage.) Make sure that the layer that is highlighted is the one you want to use, very important!
3. With the proper layer highlighted, go to Edit and then Paste as New Layer (or Control L for those that are short key obsessive like I am! ;) )
There are two ways to do this as well. 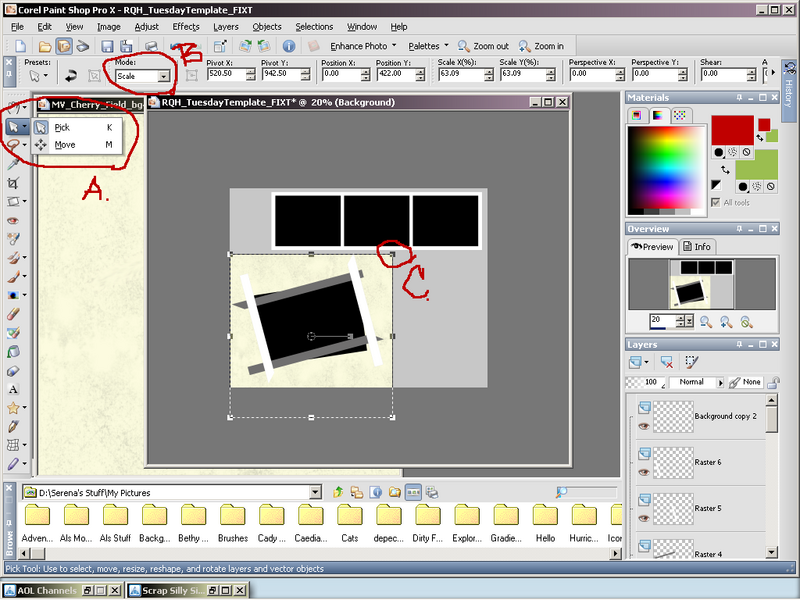
A. With the "Pick" tool now selected, you can "resize" easily the portion your
working on. This comes in very handy in later times when you're working
with photographs and are trying to get them into those little black boxes. :)
B. It's Very important that it says Scale up here or you'll end up with a funny
looking piece of material!
C. Grab by one of the corners, and move down making sure that the top and side
lines both go down so you have a perfect resize and you're not making it
longer or wider which skews your image.
4. Okay, now you don't have to rename your layers, but I do for easy reference. Otherwise it'll have a default name like Raster Eleventy Million. (yes, I have TONS of layers in my layouts because I'm obsessed with them for easy 'editing'.)
5. Next is optional. I then go to Layers and Merge and then Merge Down. That way my new background is merged with the item I'm replacing. This helps keeps the layers down to under a hundred. (okay okay, so I'm exaggerating again, it DOES keep the layer count low though.)
---
Next!
Okay, time for some photos!
1. Pick ze photo!
2. I then pick my lovely Move tool. (yes, I pet him quite often too since I abuse him!)
3. I want this first photo block to hold this picture so I click on it.
4. Using the scroll bar, I look to see where that layer is.
5. There it is!!
6. Then, the other magical tool! The magic wand!! (you'll learn to love him too if you're not already acquainted with him, he's SO helpful) That's coming up next, just wanted to show you where it's located.
Okay, this is where I probably do things Way more complicated than they need to be, but I prefer it this way and I'll explain in a moment.
I click on my picture I'm going to use and it comes up on top.. I then copy it and "cntrl L" or paste it as a new layer above my photoblock I've selected.
Then I head back and pick my "Pick" tool. Now, here I've lowered the opacity to show you what I'm doing so you can see the photoblock that we're 'resizing' to. (you can do this by using the wand, selecting the photoblock and then taking your picture and "pasting it into selection or control E" but that Seriously skews the picture and makes it look all wrong to me..)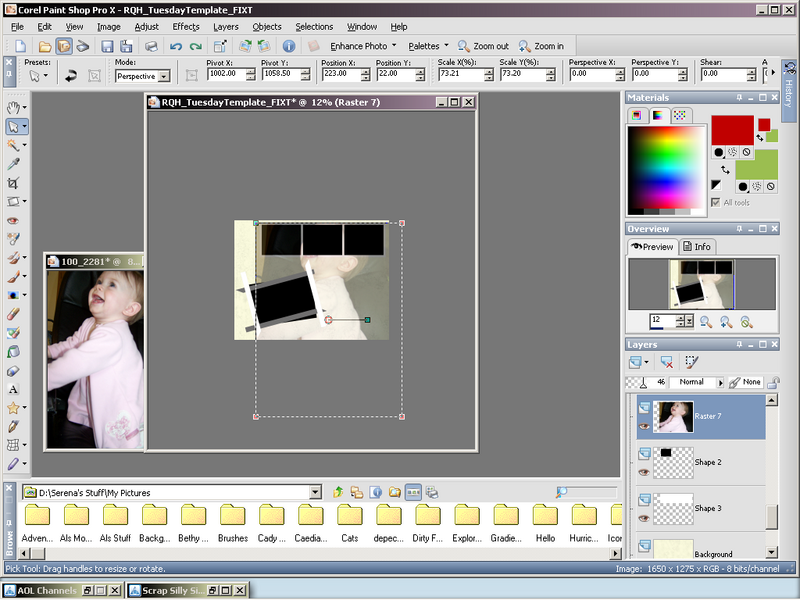
You'll notice I've made the template page "bigger" so I can find the edges with the pick tool. Then I (making sure it says scale) squish it down so that the sides fit into the photoblock. I'll then move it so that the picture is centered where I want it to be.
There, now she's exactly where I want her and I like how she's framed. 
--
1. Now, I switch back to the photo block layer (this is why it's always a good idea to paste as a new layer atop of that which you want to work on. It's always right under what you're using.
2. Wand selected, I then reclick on the photo block again, you'll notice the "marching ants" now, that means that all the "black" has been selected and we're ready to clip our photo.
3. Select Selections, and then Invert. This makes the marching ants go to the rest of the canvas that is NOT the photoblock.
4. Reselect the photo layer. This is where it's easy!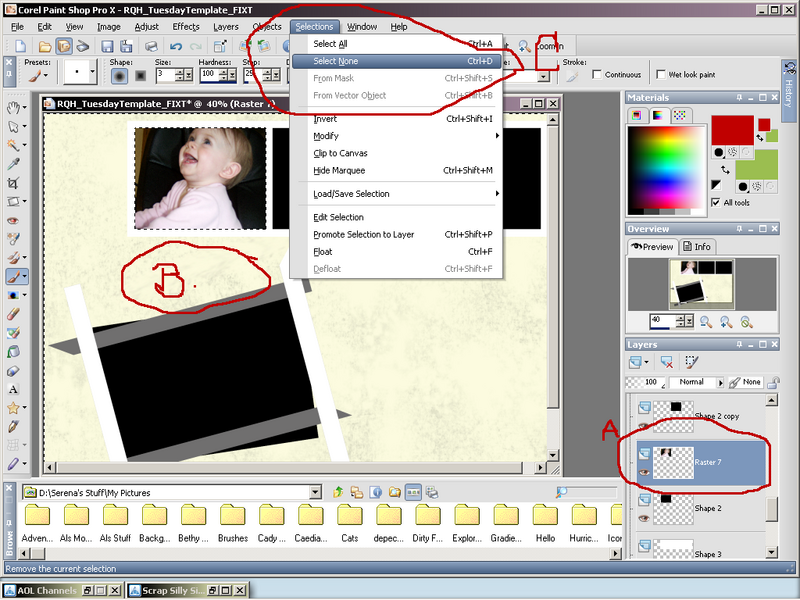
A. The photo layer!
B. Hit Delete on your keyboard! The rest of the photo is gone! Isn't that nifty?
I've upped the opacity again so you can see the finished product.
C. Go to Selections again and Select None (or control D!) the marching ants
will have dissapeared. It's important to do this.
Now, rinse, lather, repeat. For the other photos, do the same thing we just did. Select the photoblock, new layer your photo, resize it to fit the new block, reselect the block layer, magic wand it, invert selection, go back to photo layer, delete, deselect!
Okay, by now you should have all your pictures done and it's time to finish the layers and embellish!
We're almost done, don't despair!
Pictures done, it's time to go on to the frame.
I left the top three alone with the polaroid looking frame cause I really like how that looked. You can do another paper on it instead, but for now I'm going to move on to the four strips on the big picture.
Do this the same way you did the pictures. Wand select the strips, paste the paper you want, invert, delete, next! You'll find yourself clicking quickly through it in no time or finding your own short cuts that you prefer. :)
The rest is easy, embellish and go! And here's my template beauty! 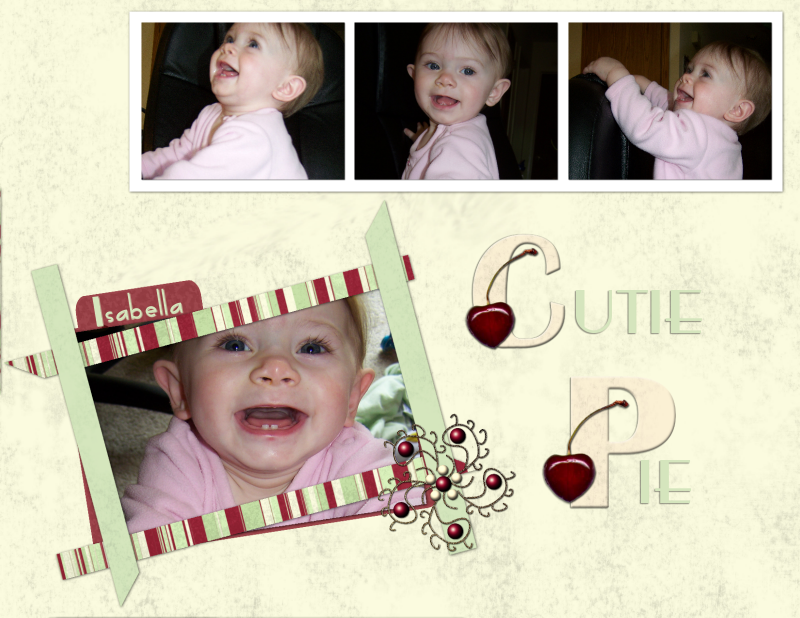
Special thanks to Ruby for the template and Maryse for the kit!
For the flat png type templates, use the magic wand to select the areas that you want to change and do the same thing pretty much. Move things around, resize appropriately, delete the excess and there you have it! Just takes longer, more tweaking, less room to mess up because you'd have to undo a whole lot if you decide you want a different paper on one of the items instead of what you started with. Or you could just reselect, but the magic wand doesn't work as well then. I really dislike flat templates, but that's just me. :)


12 comments:
Thanks for writing this up sweetie. Give me a little bit and I will put that template up on my blog again.
nice tut - and i don't even use psp! lol!
:) M
Remember when you tagged me ? Well, .... You've been tagged ! If you have time come to my blog and see the questions...
Thank you so very much for taking the time and trouble to post this tutorial. Haven't read it all yet, but am eager to understand PSP/layers and templates. Happy Easter to you and yours. :)
Great tut for PSP, we need more PSP tut around!
How are you? I just discovered your wonderful blog.
I wanted to let you know we have a number of tutorials on hybrid
You can find them here
Dragonflairestudios.com/community.
Have a great day!
Thank you for putting up a tut on how to use a template! I really was wondering how to use them :) I am going to try this one tomorrow.
I just recently referred someone to this tut and realized I never thanked you so fro showing me how to use template in PSP! So, thank you! :)
I'm bookmarking you this time....looks like I might learn a lot here!
thank you thank you THANK YOU
Free Casino Bonus tyuueooru
http://stonewalljacksoncarnival.org/ - Top Casino
2.
[url=http://stonewalljacksoncarnival.org/]Casino Free Game[/url]
Play wherever and whenever you want The best thing about online casino is that you don?t have to visit your local casino in order to meet your gambling desire.
Download Casino
3.
Your blog keeps getting better and better! Your older articles are not as good as newer ones you have a lot more creativity and originality now keep it up!
[B]NZBsRus.com[/B]
Skip Idle Downloads Using NZB Downloads You Can Swiftly Find Movies, PC Games, Music, Software & Download Them at Blazing Speeds
[URL=http://www.nzbsrus.com][B]Usenet Search[/B][/URL]
Not bad article, but I really miss that you didn't express your opinion, but ok you just have different approach
Post a Comment